Showing posts with label C#. Show all posts

Saturday, 10 May 2014

How to convert given number to word in asp.net c#

Hi friends, today i am going show you how to convert given number to word in asp.net c#.

In most of the website, application it is required to convert the number or amount in words. Following code will help you to convert a given number into words. For example, if “1234″ is given as input, output would be “One Thousand Two Hundred Thirty Four Only”


How to convert given number to word in asp.net c# Screen 1
Screen 1

How to convert given number to word in asp.net c# Screen 2
Screen 2


HTML :

 <div style="width: 100%; height: auto;" align="center">
        <div style="width: 560px; height: auto; background-color: lightgray; margin: 50px;
            padding: 25px;">
            <h1 style="margin-bottom:50px;">
                How to convert given number to word in asp.net c#
            </h1>
            <table style="width: 60%;">
                <tr>
                    <td>
                        Input Number
                    </td>
                    <td>
                        <asp:TextBox ID="txtNumber" runat="server" style="width:160px; height:25px; padding:5px;"></asp:TextBox>
                    </td>
                </tr>
                 <tr>
                    <td>&nbsp;
                    </td>
                    <td>
                        &nbsp;
                    </td>
                </tr>
                <tr>
                    <td>
                    </td>
                    <td>
                        <asp:Button ID="btnConvert" Text="Convert To Words" runat="server" style="height:25px; width:auto; padding: 0px 10px;" OnClick="btnConvert_Click" />
                    </td>
                </tr>
                <tr>
                    <td colspan="2">
                      <asp:Label ID="lbl2Way" runat="server" style="color:Green;"></asp:Label>
                    </td>
                </tr>
            </table>
        </div>
    </div>


C# Button Click Event :


//Here You need to import this package  and Num2Wrd class NumberToEnglish file. You can download class file from below link.
using Num2Wrd;
 protected void btnConvert_Click(object sender, EventArgs e)
    {
        NumberToEnglish no = new NumberToEnglish();
        string currency = no.changeCurrencyToWords(Convert.ToInt64(txtNumber.Text.Trim()));
        lbl2Way.Text = currency.ToString().ToUpper();
    }


Download Link :

 Download Complete Project


Enjoyed this post? Share and Leave a comment below, thanks! :)

Wednesday, 19 March 2014

AJAX Image Upload in Asp.net C#

We've got a sweet solution that uploads an image with AJAX and then immediately displays.

Ajax ,an acronym for Asynchronous Javascript and Xml is a group of interrelated web development techniques used on the client side to create asynchronous web applications.With Ajax, web applications can send data to, and retrieve data from, a server asynchronously (in the background) without interfering with the display and behavior of the existing page.

Here we are using ajaxupload.js to upload an image and show upload button on mouse hover and mouse out same like facebook.

On mouse out hide upload button
Screen 1


On Mouse hover show upload button

On mouse hover show upload button
Screen 2

Choose image file

choose image file
Screen 3

Finally Preview of image without postback (without refreshing page)

Upload image without postback
Screen 4

JS :

You need this following javascript file to perform AJAX Image Upload they are following:

  • jquery-1.7.2.min.js

  • ajaxupload.js

HTML:

<div align="center" style="width: 100%; height: auto;">
        <div style="width: 960px; height: auto;">
            <div style="background-color: #eee; border: 1px solid #CCC;">
                <h1>
                    AJAX Image Upload in Asp.net C#</h1>
                <h4>
                    Contains front-end (jQuery) and back-end code (c#) to upload an image and display
                    the same image on screen.</h4>
                <div align="left">
                    <h4 style="margin-left: 60px;">
                        > On Mouse hover show upload button</h4>
                    <h4 style="margin-left: 60px;">
                        > On Mouse out hide upload button</h4>
                </div>
                <div style="width: auto; height: auto; margin-top: 45px; margin-bottom: 50px; margin-left: 420px;
                    overflow: hidden;">
                    <div class="pic" style="float: left; height: 160px; width: 150px; border: 1px solid #CCC;">
                        <img id="imgUser" height="160" width="150" src="Images/NoPhotoAvailable.jpg" runat="server" />
                        <div align="center" style="height: 23px; z-index: 5; width: auto; position: absolute;
                            bottom: 0px; right: 0px;">
                            <asp:Button ID="btnUpload" ValidationGroup="vgUploadImage" runat="server" Text="Upload"
                                class="btn-update" Style="border: 0px; width: 69px; height: 23px; margin: 0px;
                                background-color: #93bbe1;" />
                        </div>
                    </div>
                </div>
                <div style="width: auto; height: 80px; margin-left: 35px;">
                    <div style="height: 25px; width: auto;">
                        <asp:Label runat="server" ID="lblImageMsg"></asp:Label>
                        <asp:TextBox ID="txtImage" placeholder="Image name come here" runat="server" Style="height: 30px;
                            font-size: 16px; width: 250px;"></asp:TextBox>
                    </div>
                </div>
            </div>
        </div>
    </div>

Script :

//Ajax Upload Script
        $(function() {
            new AjaxUpload('#<%=btnUpload.ClientID %>', {
                action: 'UploadHandler.ashx?Image=True',
                onComplete: function(file, response) {
                    debugger;
                    if (response != null) {
                        $('#<%=imgUser.ClientID %>').attr('src', response.toString());
                        document.getElementById("<%=txtImage.ClientID %>").value = file.toString();
                    }
                    else {
                        alert('Response is null!!!');
                    }
                },
                onSubmit: function(file, ext) {
                    if (!(ext && /^(jpeg|png|gif|bmp|jpg)$/i.test(ext))) {
                        alert('Invalid Image Format.');
                        return false;
                    }
                }
            });
        });

// If you don't want to show upload button on mouse hover and out just remove this code.

//On mouse hover and mouse out show/hide button code
        $(document).mousemove(function(e) {
            var $targ = $(e.target);
            if ($targ != "") {
                if ($targ.closest('.pic').length || $targ.is('.pic').length || $targ.closest('input[type=file]').length || $targ.is('input[type=file]').length) {
                    $('#<%=btnUpload.ClientID %>').show();
                }
                else {
                    $('#<%=btnUpload.ClientID %>').hide();
                }
            }
        });

Handler Code :

if (context.Request.QueryString["Image"] != null && context.Request.QueryString["Image"].ToString() != "")
        {
            if (context.Request.Files[0] != null && context.Request.Files[0].ToString() != "")
            {
                HttpPostedFile postedFile = context.Request.Files[0];

                string ImagePath = "UploadedImage/";
                postedFile.SaveAs(System.Web.HttpContext.Current.Server.MapPath(ImagePath) + postedFile.FileName.ToString());

                context.Response.Write(ImagePath + postedFile.FileName.ToString());
                context.Response.End();
            }
        }

Download Link :

Download Complete Project

Enjoyed this post? Share and Leave a comment below, thanks! :)

Friday, 14 February 2014

How to Upload/Display Image in Picture Box using OpenFileDialog in c# .net


Introduction:

Browsing and displaying an image in picture box tool using  Windows Forms application is a very simple task. In this application, we use the following classes/controls to do the b.

- OpenFileDialog
- PictureBox
- TextBox
- Button 


Main Functions:

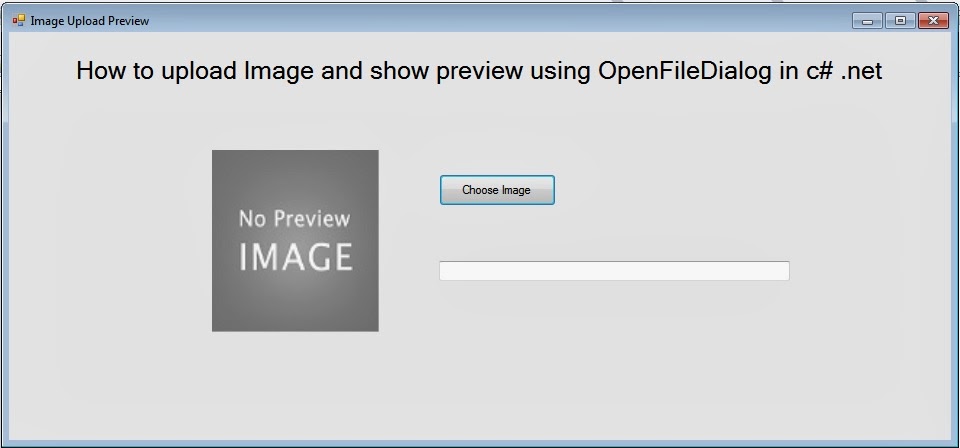
This functions simply perform the following steps:
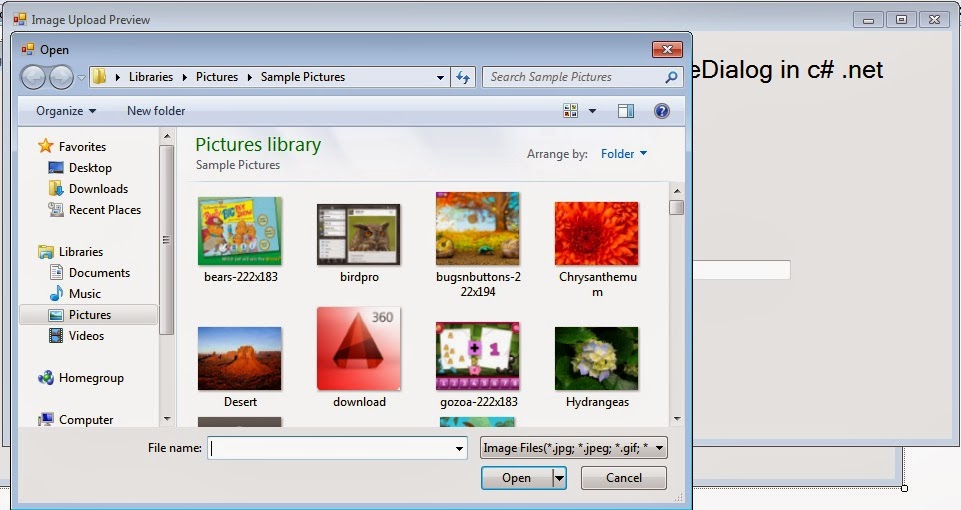
1. Open a file dialog box so that a user can select an image from his/her machine
2. Browse the image
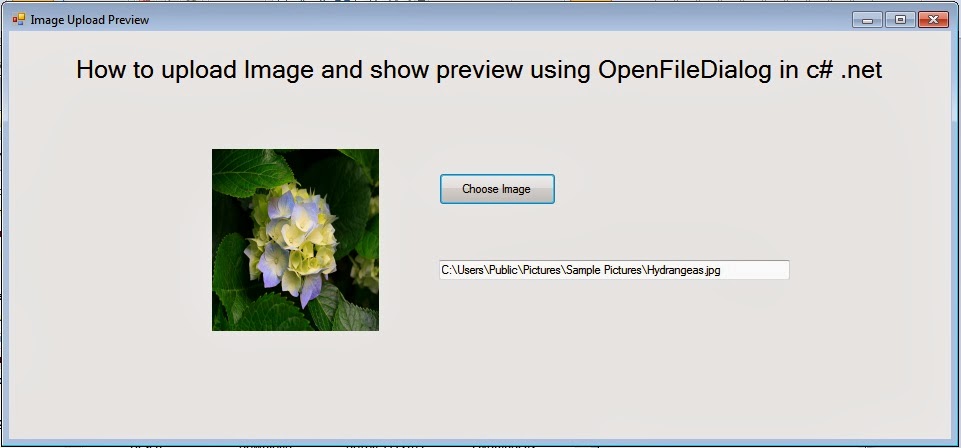
3. Display selected image in a picture box on a Form
4. Display image file path in text box 


Screen Shot:

Screen 1
Screen 1

Screen 2
Screen 2

Screen 3
Screen 3

Source Code: 

            //Initialize Componets
        public ImageUploadAndPreview()
        {
            InitializeComponent();
        }


        //When Button Click
        private void button1_Click(object sender, EventArgs e)
        {

            // open file dialog
            OpenFileDialog open = new OpenFileDialog();


            // Filter Image
            open.Filter = "Image Files(*.jpg; *.jpeg; *.gif;     *.bmp)|*.jpg; *.jpeg; *.gif; *.bmp";
            if (open.ShowDialog() == DialogResult.OK)
            {
                pbImage.Image = new Bitmap(open.FileName);
                pbImage.SizeMode = PictureBoxSizeMode.StretchImage;
                txtImage.Text = open.FileName;
            }
        } 


What is an image filter?

 Image filter is basically a filter that restrict user to select only valid image file. You can remove image filter.  

Download Link

 https://drive.google.com/file/d/0B7XVDU9gdC-lZGRjdENjMGpiNWs/edit?usp=sharing

 If you have any query feel free to comment it will be appreciated :)

Wednesday, 18 December 2013

What is the difference between Public, Private, Protected, Static in ASP.NET


Access Modifiers

Public :

The type or member can be accessed by any other code in the same assembly or another assembly that references it.

Private :

The type or member can only be accessed by code in the same class or struct.

Protected :

The type or member can only be accessed by code in the same class or struct, or in a derived class. 

Static

The static modifier on a class means that the class cannot be instantiated, and that all of its members are static. A static member has one version regardless of how many instances of its enclosing type are created.
A static class is basically the same as a non-static class, but there is one difference: a static class cannot be externally instantiated. In other words, you cannot use the new keyword to create a variable of the class type. Because there is no instance variable, you access the members of a static class by using the class name itself.
However, there is a such thing as a static constructor. Any class can have one of these, including static classes. They cannot be called directly & cannot have parameters (other than any type parameters on the class itself). A static constructor is called automatically to initialize the class before the first instance is created or any static members are referenced. Looks like this:

static class Foo()
{
    static Foo()
    {
        Bar = "fubar";
    }

    public static string Bar { get; set; }
}